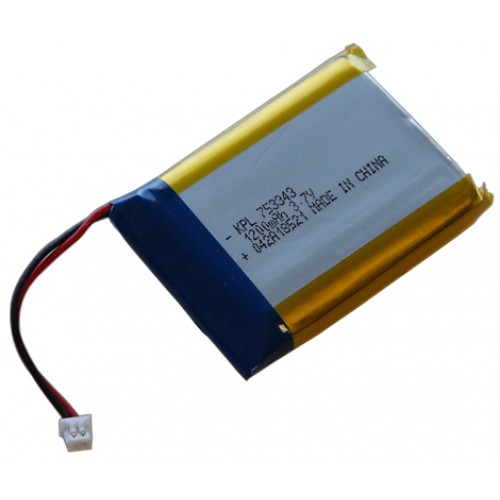
1200mAh 3.7V battery pack for ODROID-GO

This is a spare part for ODROID-GO Kit.

Lithium Polymer rechargeable cell with a Protection circuit. 
Capacity : 1200mAh / 3.7V 
Dimension : 45 x 32 x 6 mm (+/- 0.3mm tolerance) 
Lead wires : AWG#28, 40mm 
Connector : Molex 51021-0200 

Protection Circuit Specification
- Over charge protection voltage : 4.28V 
- Over charge release voltage : 4.08V 
- Over discharge protection voltage : 3.0V 
- Over current protection current : 3.5A


Expected w/c 13th AUGUST


***BUILD YOUR OWN HANDHELD GAMING SYSTEM !!***


To celebrate ODROID’s 10th anniversary, we present the ODROID-GO Game Kit!

It includes a special anniversary board with all the parts to put together your own game kit and see the workings behind such a device. It is not only a fun assembly project but also an educational tool to learn about all the hardware and software that goes into building such a device.


Have fun building your own handheld game kit while learning about the internal functions of each part and its purpose. Learn how each button is attached to a PCB switch pad, what materials are used, and how to put it all together to create a button control pad to play games! Learn how to connect power, speakers and how to download and install an OS. Learn why certain pieces are made of particular materials and why you need certain connectors. Since the device is clear, all the internal components and all the lights are visible. 


PLAY VINTAGE GAMES

Once you have assembled the ODROID-GO, you can download and install the games of yesteryear to play - comfortable in the knowledge that they're on a device you built for yourself!


ASSEMBLY INSTRUCTIONS


This section shows you how you can build the ODROID-GO. Please carefully follow the instruction below.


LCD window

First, in order to protect LCD screen, you have to place the enclosed plastic screen cover on the front enclosure. Please completely remove the sticker on the back of the screen cover and carefully place it on the front enclosure.


LCD screen

Second, you need to attach the 2.4” LCD screen to the front enclosure. Please note that you must remove the vinyl cover on the LCD screen before placing LCD module in the front enclosure. Also, you would need to slightly wipe or blow out the window cover or LCD screen in order to remove any dust or fingerprints.


Play buttons

Third, place the play buttons in the front enclosure. You need to cut and remove the plastic buttons (an arrow key piece, buttons 'A' and 'B') from the plastic button set enclosed, and then put the rubber pieces on top of the plastic keys.


Main board

Next is the main part of the assembling instructions. Please carefully put the ODROID-GO board in the front enclosure and connect the LCD cable to the board. After the LCD screen cable is firmly connected, you can fasten the main board with the screws (3x) enclosed.


You also need to connect the battery pack and speaker module to the ODROID-GO board. It would be a good idea to wrap the speaker wires as shown in the picture, otherwise, it would be difficult to close the back enclosure.


Power key

Another piece which you have to cut on the plastic button set is the power key, and you can place the power switch at the side of the ODROID-GO.

Close the back enclosure

Finally, you can close the back enclosure of the ODROID-GO with the screws (6x) enclosed. You can also try to turn on the ODROID-GO before closing the back enclosure.

Testing before playing

You can turn the device on or off with the power switch on the right side of the ODROID-GO. Please softly slide the key up to turn on or down to turn off.

Memory card

Since the ODROID-GO loads the games from the memory card (Micro SD type), you must insert a memory card in the card slot on the bottom of the ODROID-GO. In order to copy the game images to the memory card, please visit the link.

If the memory card is not inserted or fails for any reason, you will have an error screen when you turn on the ODROID-GO.


Make a SD card for Importing ROMS

Insert a SD card to the system before proceed with.

Windows

Open a This PC window and click mouse right button on the SD card, then click format.

Select options referring to the screenshot below, and make sure that FAT32 is selected for the File system.

Click the Start button, then click OK button to proceed.

Then this tool formats SD card as FAT file system.

Linux

Press shortcut ALT+CTRL+T to open a Terminal window.

Find out the device file name for inserted media.

joshua@joshua-desktop:~$ sudo fdisk -l...Disk /dev/sdc: 7.4 GiB, 7948206080 bytes, 15523840 sectorsUnits: sectors of 1 * 512 = 512 bytesSector size (logical/physical): 512 bytes / 512 bytesI/O size (minimum/optimal): 512 bytes / 512 bytesDisklabel type: dosDisk identifier: 0x00000000 Device     Boot Start      End  Sectors  Size Id Type/dev/sdc1        2048 15523839 15521792  7.4G 83 Linux

In my case, /dev/sdc is that name.

Unmount the partitions for the SD card.

joshua@joshua-desktop:~$ sudo umount /dev/sdc?

Enter the following command to format as FAT.

joshua@joshua-desktop:~$ sudo mkfs.fat /dev/sdc1mkfs.fat 4.1 (2017-01-24)

Eject and insert again the SD card.
And Enter the command below to check if the SD card is mounted well and the partition is FAT.

joshua@joshua-desktop:~$ df -ThFilesystem     Type      Size  Used Avail Use% Mounted on.../dev/sdc1      vfat      7.4G  4.0K  7.4G   1% /media/joshua/3B5E-B96C

Download Skeleton file 
Uncompress and you can see 2 directories, odroid and roms.

Move them into the top-level of the FAT formatted SD card.

  • Move the games to the proper directory under the /roms directory of the SD card.
    • Generally, the name of the target directory is the abbreviation of the system.
    • e.g. If you have some Sega Master System games, move it to /roms/sms directory.

Move the games to the proper location of the SD card.

  • Additional ROMs can be added to the appropriate folder in /roms:
    • nes - Nintendo Entertainment System
    • gb - Nintento GameBoy
    • gbc - Nintendo GameBoy Color
    • sms - Sega Master System
    • gg - Sega Game Gear
  • ROM files must be decompressed (unzipped) and have the same extension as the folder in which they are placed.

Insert that prepared SD card into your ODROID-GO and turn on the power.

  •  - A card could not be detected. Ensure the card is properly inserted.
  •  - Files are not properly written to the SD card, or its contents are corrupted.


Then the Emulator imports the games automatically so that you can play them right away

1200mAh 3.7V battery pack for ODROID-GO

  • Product Code: 1200mAh 3.7V battery pack for ODROID-GO
  • Availability: In Stock
  • 8.39€